Did everyone enjoy that oh so romantic holiday? Get anything fun? Here in the Douglas household it was low-key but special. I honestly didn't expect anything since I just got flowers two weeks ago wishing me a great start to grad school.
But to my surprise, 12 beautiful roses awaited me on the table along with my favorite candy and a card. JD said since our Valentine celebrations in the past have been slim to none, he wanted to make this one special. It was very much appreciated.
On to another thought... a few weeks ago I received an e-mail from my mom that went a little something like this...
"Hi honey. I was just reading through your blog and I think you should include more of your wedding pictures on your blog, since it's mostly about you guys."
So in honor of V-Day and my mom's request, I thought I'd share our wedding snapshot video with you all. Please excuse the making out in the beginning, we were told to do it! :) Thanks to Derek Dienner for creating such an awesome video.
Douglas Wedding Snapshot from Derek Dienner on Vimeo.

Wednesday, February 16, 2011
Thursday, February 10, 2011
A Quick Thought
On saving money.
I just walked in from my grad class a few minutes ago and got in the blogging mood. Tonight at class we discussed our personal ties to reading, and I was quick to mention my thrill for blogs. I got a little bummed about my lack of posts and was inspired to share a quick thought.
 Let's rewind to about 4 ago hours ago when I was debating on whether or not to stop at Starbucks for a hot beverage on this FREEZING day. I'm getting tired of this cold, snowless weather so either snow or bring on the spring. But anyway, when saving money some people tend to think of transferring a sum of money each month into their saving account.
However, JD and I realized that saving can also occur on a day-to-day basis. We manage this by eliminating the little things that over time add up to big savings. Like skipping Starbucks and making my own tea. Or like on Sunday when we planned on grabbing subs from subway but realized we had plenty of sandwich stuff at home.
Don't get me wrong, I still occasionally buy Starbucks and we always treat ourselves on our Friday night dates, but we feel it's ok because we eat at home throughout the week.
Summary of my quick thought: A lot of little purchases can add up quickly. Look at your everyday spending to see where you can save a buck a or two.
I just walked in from my grad class a few minutes ago and got in the blogging mood. Tonight at class we discussed our personal ties to reading, and I was quick to mention my thrill for blogs. I got a little bummed about my lack of posts and was inspired to share a quick thought.

However, JD and I realized that saving can also occur on a day-to-day basis. We manage this by eliminating the little things that over time add up to big savings. Like skipping Starbucks and making my own tea. Or like on Sunday when we planned on grabbing subs from subway but realized we had plenty of sandwich stuff at home.
Don't get me wrong, I still occasionally buy Starbucks and we always treat ourselves on our Friday night dates, but we feel it's ok because we eat at home throughout the week.
Summary of my quick thought: A lot of little purchases can add up quickly. Look at your everyday spending to see where you can save a buck a or two.
Saturday, February 5, 2011
A Few Things

Wow! Today I just hit a big milestone for the bloggy-blog. This is post number 100! I started this blog blindly about two years ago. I knew/know very little about blogging and continue to learn as I go. I just want to say how thankful I am for all my faithful readers. Without you, I wouldn't have a reason to blog. I am thrilled with the little community we've started here at High Style on a Small Budget. Your comments mean the world to me, they seriously makes me feel like this...

Last week I posted a status on facebook saying, "

Monday, January 31, 2011
A Lover's Holiday
also known as Valentine's Day is quickly approaching. Some have very mixed feelings about this day...

Back in the reader's survey, a few of you mentioned you wanted a Valentine's post. So if you're married, dating, single, or anywhere in between, I put together a post, upon your request, entitled, All things Valentine's.
First up Decorations, some of these I spotted in a cute shop in Georgetown, others I found on the net.


 or fill an old wine bottle or mason jar with 15 (or any amount you want) little notes that display qualities or things you admire about your significant other. They could read all the notes in one sitting or only be allowed to read one per day. Then tie some pretty ribbon around the top. Guys cherish personal homemade gifts just like us gals.
Movies
Invite a few good girlfriends over or if you can, convince your man to sit down and get lost in a good chick flick. A few good ones in random order...

Titanic, The Notebook, Dirty Dancing, Sleepless in Seattle, When Harry met Sally, Sweet Home Alabama, Notting Hill, Gone with the Wind, Pretty Woman, and the list could go on forever.
Do Something Extra
I'm all about being simple here people. Valentine's day is all about showing your love or that you care for someone. For me, it's not about fancy gifts but in the little things. I'm not saying I don't enjoy a beautiful bouquet because I sure do, but here are some simple ways to show your appreciation...
- It's a Hallmark holiday made to guzzle money
- who needs a special holiday to celebrate love?
- I love it! It makes me feel so special
- I'm single so could care less
- it disgusts me, it just reminds me that I don't have a special someone
- it's one day that causes me to slow down and realize how lucky I am to have ____________.

Back in the reader's survey, a few of you mentioned you wanted a Valentine's post. So if you're married, dating, single, or anywhere in between, I put together a post, upon your request, entitled, All things Valentine's.
First up Decorations, some of these I spotted in a cute shop in Georgetown, others I found on the net.


Homemade Gift Ideas
for anyone. Not just your significant other but teacher, friend, or mom. Love the idea of these cookies, a bookmark, or bath fizzes with a hidden message...


Movies
Invite a few good girlfriends over or if you can, convince your man to sit down and get lost in a good chick flick. A few good ones in random order...

Titanic, The Notebook, Dirty Dancing, Sleepless in Seattle, When Harry met Sally, Sweet Home Alabama, Notting Hill, Gone with the Wind, Pretty Woman, and the list could go on forever.
Do Something Extra
I'm all about being simple here people. Valentine's day is all about showing your love or that you care for someone. For me, it's not about fancy gifts but in the little things. I'm not saying I don't enjoy a beautiful bouquet because I sure do, but here are some simple ways to show your appreciation...
- Place some candy and a small card on the car windshield
- fill up the gas tank
- get up early and make breakfast
- If you're married like me and if you do something that annoys your spouse, make an extra effort not to do it. Ok honey, I'll put my dishes in the sink and not leave them on the coffee table :)
- Send them an e-card at work
- give up the remote for a night or two
Saturday, January 29, 2011
Pillow Tutorial
When I first shared my homemade pillow, I'm promised a tutorial. Here it is...
Materials:
Cut fabric to the desired length of pillow. Allow an extra inch for each side. If you want your pillow to be 12 inches long, measure 13 inches. For this tutorial I didn't really care what size my pillow came out to be, so I just measured a 12 inch square.


Step 9
Hand sew together, carefully removing pins once you get to them. Tie a secure knot at the end and your done!!
If you want to add the flowers, check out this tutorial. I just overlapped mine instead of making them so circular.
Depending on what I'm feeling, I can choose to display either side of the pillow.


Materials:
- Fabric
- Fusible Fleece (optional but recommended)
- Needle/Thread
- Pins
- Iron
- Ruler/Scissors/Pencil
- Sewing Machine
- Polyester filling
Cut fabric to the desired length of pillow. Allow an extra inch for each side. If you want your pillow to be 12 inches long, measure 13 inches. For this tutorial I didn't really care what size my pillow came out to be, so I just measured a 12 inch square.

Step 2
Cut another panel the same exact size for the other side of the pillow. You can use the same fabric or two different kinds (depending on how you want you pillow to look). To keep things interesting, I chose 2 different types of fabric. I just placed the fabric over top and cut around it. I do not have a lot of patience for measuring. Repeat with 2 more fleece panels.

You should now have 4 panels (2 fabric and 2 fleece) all cut to the same length.

Step 3
Fuse one piece of fleece to one fabric panel following the directions on the fleece. Just lay the fabric on top of the fusible side of the fleece and iron together for 15 seconds. Iron slow and steady so they adhere. Repeat for second piece of fleece and fabric. You should now have two panels.
Tip: I use fleece so the shell of the pillow is thicker, sturdier, and more durable.

Step 4
Place two panels together fabric side touching.

Step 5
Sew panels together. When you finish sewing one length the pillow, rotate and continuing sewing all the way around.
Leave a 4 inch gap in the middle of one side.


It should now look like this...

It got a little uneven, so I carefully trimmed the sides but be careful not to cut too close to the seem.
Step 6
Carefully snip off all 4 corners.

Step 7
Turn pillow right side out through 4 inch gap. Using your finger make sure to poke out the corners. Stuff with polyester filling. I stuff it nice and full. Almost done.
Step 8
Carefully fold fabric over at 4 inch opening and pin shut.

Step 9
Hand sew together, carefully removing pins once you get to them. Tie a secure knot at the end and your done!!
If you want to add the flowers, check out this tutorial. I just overlapped mine instead of making them so circular.
Depending on what I'm feeling, I can choose to display either side of the pillow.


Happy pillow making!
Thursday, January 27, 2011
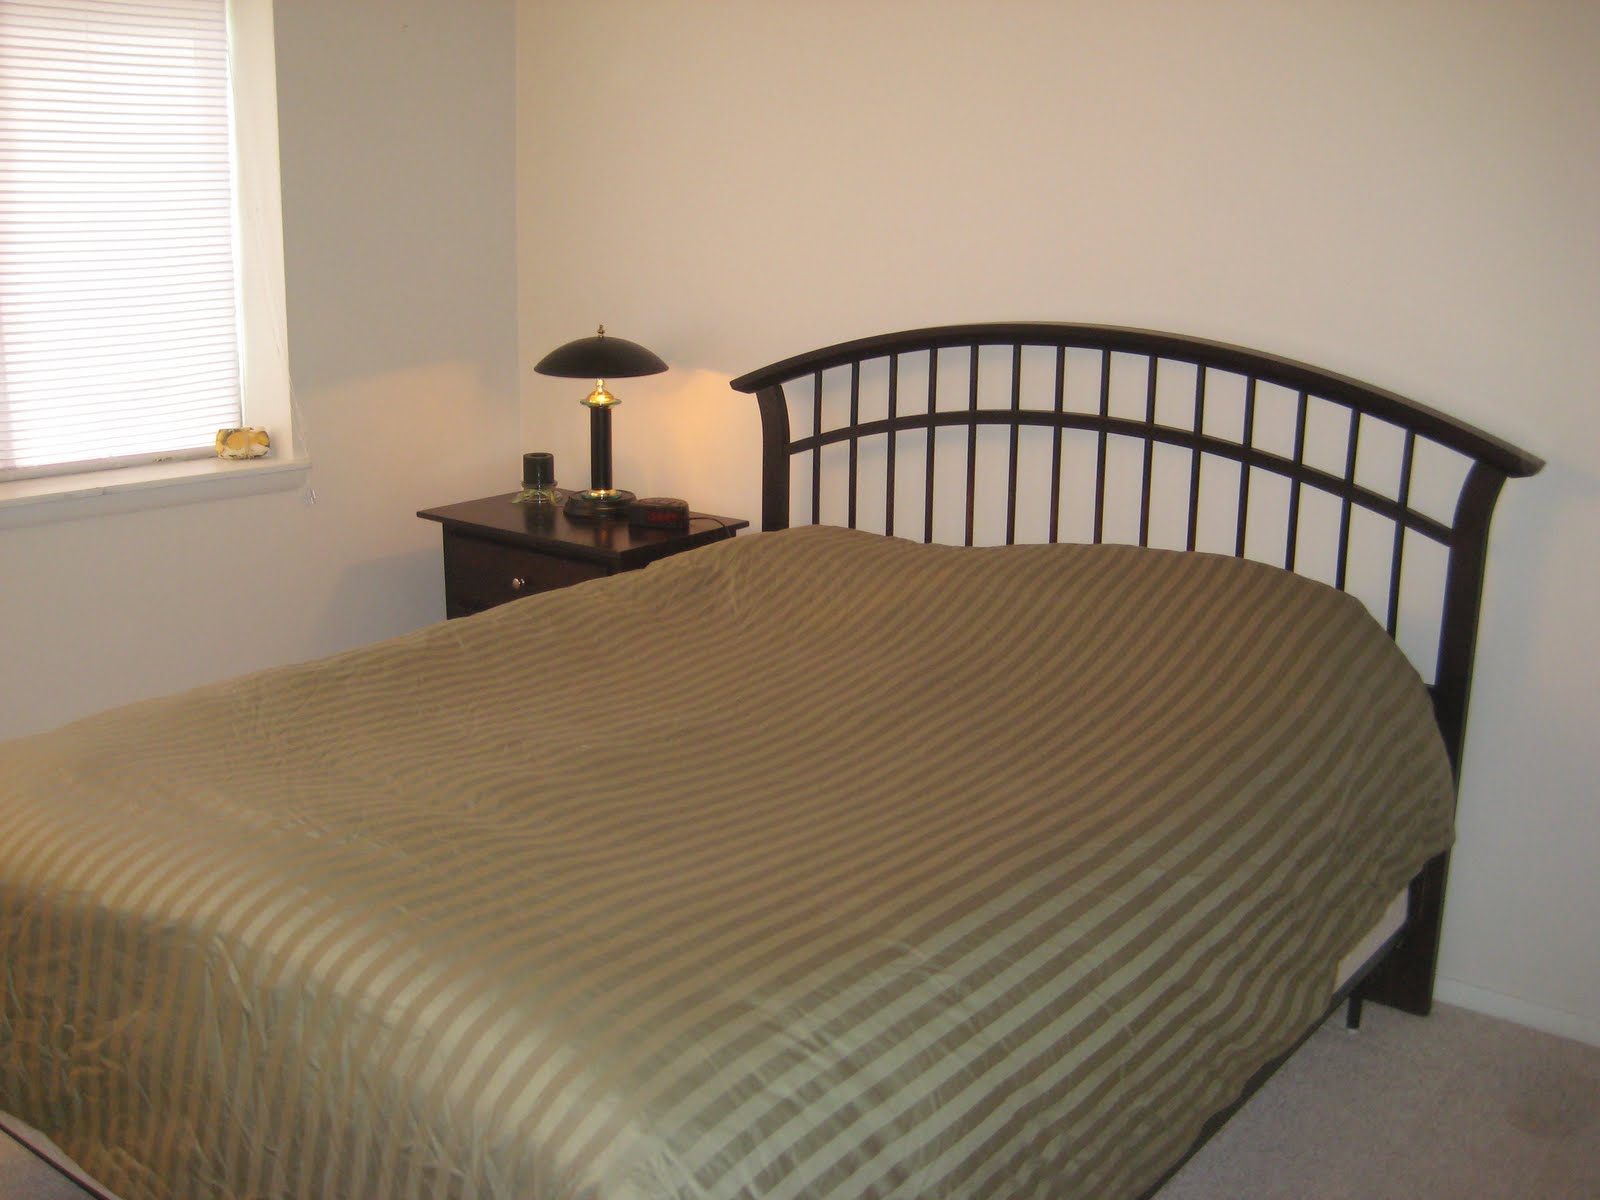
Bedroom Reveal
I've been working on our bedroom for about two weeks. I first gave you a sneak peek, then shared the battle I had over the new bedding, created a homemade pillow, and then put together wall art with fabric and frames.
Before I show you what it looks like now, let's rewind to the very beginning...
Then came makeover number one in the summer of '09...
Now here it is January 2011...


 On the window sill I put together a few books, metal letters, and a small vase with some flowers. I added some height with a picture that I made. It consists of newspaper and a few maps placed over some cardboard. I chose maps that had personal meaning to us. They are: Germany - our first trip to Europe together, Pennsylvania - where we met, and then Washington DC - where we live now.

Grand Total: $87.36
Not too shabby.
Before I show you what it looks like now, let's rewind to the very beginning...
Then came makeover number one in the summer of '09...

Now here it is January 2011...


There's the trunk I bought off craigslist. I decided to keep it the original color and placed it at the foot of the bed for some added color and storage in the room. It holds extra blankets and sheets and keeps our pillows off the floor when we go to bed.
So there you have it. It was very hard to photograph. It was so bright this morning and then a bit dark this afternoon. I tried my best to get the ideal lighting. Now for the price.
Here's what I bought:
- Duvet cover: $67.00
- Grayish/Blue pillow: $8.00
- Wall Art: $12.36
- Curtains:
$29.00, free with gift card
Grand Total: $87.36
Not too shabby.
That's how our room looks today. I really am pleased with the outcome. We'll see how long it stays that way before I decide to change it again. ha. I do love me a good makeover.
Monday, January 24, 2011
Frames, Fabric & Fun
I thought I'd use some alliteration in the title since the 5th graders just wrapped up their poetry unit, and I have a zillion poetry terms fresh in my mind.
I found a few fame displays out here in blog land (check them out here and here) and wanted to give it a whirl myself. So, my hunt for frames began. I did not want to spend a lot of money and was ready to plow through the clearance racks. Are you ready for some crazy finds? I bought...

5 frames for $6.00. Crazy. I lightly sanded each frame and painted them all a dark gray.
I wanted to add some color to the walls (without actually painting) so I added some colorful fabric to each frame. It took me a while (a good 25 minutes) to find fabrics that were cohesive but not too matchy matchy. Here's what I found...

I cut out the fabric to fit each frame. I tried multiple arrangements on the floor before deciding which one I liked the best.

I got all the fabrics for $6.36. This project was fun from start to finish.
Grand total: $12.36
Now that's what I call High Style on a Small Budget!
Can't wait for you to see them in action (by that I mean hanging still on my bedroom wall) when I reveal the new bedroom.
Have you been following along? If not, check out the sneak peek, new bedding, and homemade pillow posts to get caught up.
I found a few fame displays out here in blog land (check them out here and here) and wanted to give it a whirl myself. So, my hunt for frames began. I did not want to spend a lot of money and was ready to plow through the clearance racks. Are you ready for some crazy finds? I bought...
- 1 frame from T J Maxx on clearance for $2.00
- 2 frames from Michaels, $1.00 each
- 2 frames from Salvation Army, $1.50 each

5 frames for $6.00. Crazy. I lightly sanded each frame and painted them all a dark gray.
I wanted to add some color to the walls (without actually painting) so I added some colorful fabric to each frame. It took me a while (a good 25 minutes) to find fabrics that were cohesive but not too matchy matchy. Here's what I found...

I cut out the fabric to fit each frame. I tried multiple arrangements on the floor before deciding which one I liked the best.

I got all the fabrics for $6.36. This project was fun from start to finish.
Grand total: $12.36
Now that's what I call High Style on a Small Budget!
Can't wait for you to see them in action (by that I mean hanging still on my bedroom wall) when I reveal the new bedroom.
Have you been following along? If not, check out the sneak peek, new bedding, and homemade pillow posts to get caught up.
Sunday, January 23, 2011
Homemade Pillow
I have been working on report cards for hours (ahhh) and need a break. So, I wanted to share with you my latest creation.
If you have been reading the blog recently, you know that I am redoing our bedroom. I have already given you a sneak peek and shared with you our new bedding. I am almost ready to show you the whole room.
I bought a new decorative pillow for our bed and have been looking for another one. I really didn't want to spend a lot of money, and actually I haven't been able to find one I like. So I thought, why not make one? So, last night I did.
I had some extra gray fabric on hand and it was perfect for the mini-pillow (it's 8 in. by 8 in.) I wanted to make. It took me about 2 hours. After I made the pillow, I used this tutorial as a guide to add some colorful flowers. I say guide because mine are more overlapped and not so circular.

 I plan on making a tutorial for this pillow at some point. It is so easy. I had an awful migraine while making it and was in no mood to stop every step and take pictures.
If you look closely you can see the new bedding and other pillow I purchased for $8.00 on sale. I was over-the-moon excited when I scored that deal.
I am very pleased with my custom made pillow and love the feel it adds to the bed.
If you have been reading the blog recently, you know that I am redoing our bedroom. I have already given you a sneak peek and shared with you our new bedding. I am almost ready to show you the whole room.
I bought a new decorative pillow for our bed and have been looking for another one. I really didn't want to spend a lot of money, and actually I haven't been able to find one I like. So I thought, why not make one? So, last night I did.
I had some extra gray fabric on hand and it was perfect for the mini-pillow (it's 8 in. by 8 in.) I wanted to make. It took me about 2 hours. After I made the pillow, I used this tutorial as a guide to add some colorful flowers. I say guide because mine are more overlapped and not so circular.


If you look closely you can see the new bedding and other pillow I purchased for $8.00 on sale. I was over-the-moon excited when I scored that deal.
I am very pleased with my custom made pillow and love the feel it adds to the bed.
Subscribe to:
Posts (Atom)