Friday, May 28, 2010

Bridal Shower Invitations

I have often referred to the genuine excitement I get from landing a deal or finding a treasure on the clearance rack (I mentioned a similar experience here). I recently wanted to jump up and down when I scored my most recent deal. I was on the hunt for classy yet somewhat inexpensive bridal shower invitations.

I debated on purchasing them online and having them printed, but quickly found that out of my price range. I wanted that same look but was convinced with a little DIY, I could pull it off.

I needed 24 invitations, but wanted a few to spare. I first checked out Target. I found some I liked, but with a Michael's 40% off coupon in my pocket, I had to check there before I made my final decision.

Once in Michael's I scanned the wedding isle until BINGO, I spotted just want I wanted. I found a set of 50, blue wedding invitations. I was elated because they matched her wedding colors. I did another silent cheer to myself when I realized the bride could use the response cards and envelopes as thank-you notes for all her bridal gifts. Don't hang up yet, the story gets better.

As I walked to the check out lane, I probably looked like a kid in a candy store. I was so excited to find exactly what I wanted, with the added thank-yous included. I couldn't wait to whip out my coupon and watch the savings flash before my eyes. I waited patiently as a sweet elderly lady was checking out. She turned to me and said, "Could you use a 50% off coupon, it expires today?" I said, "Yes, thank you so much." The bells in my head went off as the adrenaline surged through my veins. The lights began to flash, did I just win a car on the Price Is Right? Call me a nerd, I know.

I couldn't wait to show my husband the cute invitations and the receipt that revealed all savings. Grand total: $13.26

Here's what I had to work with:
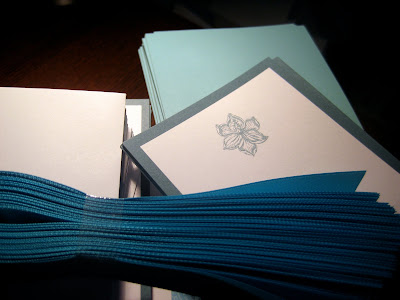
After 2 hours of designing/adjusting the layout then fighting with the printer, I had my final product ready to ship:
So there you have it, handmade invitations with class, style, and flair. With creativity, a budget-friendly eye, and the help of a sweet elderly lady, the invitations were complete.

Friday, May 21, 2010

Friday Night Dates

This August JD and I will be married for two years. After getting married and moving to DC, we quickly found ourselves falling into a Friday night routine. Before I explain, let's rewind...

When we got married we decided to spend our money very carefully. Newly married, with new bills neither of us experienced before, we were devoted to careful spending.

So each week we plan out our meals, go grocery shopping for the ingredients, and have 3-4 meals planned to cook at home. We felt this was the best possible way to avoid, "What's for dinner tonight?" and feeling tempted to go out for dinner, or even pick up Subway, and spending extra money we didn't need to spend.

All of this led to our Friday Night Dates. It is once a week when we splurge, spend quality time together, and catch up after a hectic work week. We enjoy going out, ordering in, or picking up t0 go food every Friday. Since we have lived here in the DC area we have ventured to many restaurants on Friday evenings. Sometimes getting right in and at other times waiting over an hour. We try to find new places but can't resist doubling and sometimes tripling at our favorite spots.

A few locations caught on camera


Not even the blizzard of 2010 kept us from on weekly treat. We hiked to Outback in the mist of a a crazy snow storm.

Last night we went to TGI Friday's and then spent some time at one of our favorite spots--Barnes & Noble. We are quite the adventurous couple! ha...just kidding. JD catches on up on all the video game news while I browse through celebrity trash or my new favorite, home decor magazines. We love the atmosphere that any book store provides.


Anyone else have a favorite coffee shop or park you like to visit often? Or what about a weekly ritual or something you look forward to on the weekends?

Enjoy your weekends everyone!

Sunday, May 9, 2010

Flower Pot: Before and After

My Valentine's gift this year was a pretty, purple, petite orchid. This is my first orchid and I am happy to say she is still alive and growing! However, I noticed the other day that the plant was quickly out growing the pot.

Here is the original pot and the roots busting at the seems.

So Saturday, JD and I went to Home Depot on the hunt for a new pot and soil. Little did we know, orchids have their own special pots and soil. The pot must have a hole in the bottom for proper draining and their is soil especially made for orchids. Maybe this is common knowledge but we know next to nothing about plants, gardening, etc.

Here is the special orchid soil. I have enough to last me a lifetime.
So for $5.83 we had what we needed.

I didn't think about it until we got home but the clay color pot was boring and was quite ugly on our window sill. I had just the idea to liven that baby up.

I went back to this post I stumbled across a few months ago. With a few adjustments, I was ready to paint my pot.

Here it is BEFORE:
In the post above, they suggest sealing the pot with water concealer. Water can seep through clay and ruin the paint. In attempt to spend as little money as possible I went with a craft sealer I already owned. Now it doesn't say if it is water proof, but I was willing to take my chances.

So I gave the whole pot, inside and out, a good spray. I sprayed the outside to hopefully help with the painting (more on that later).
After it dried, I was ready to paint. I actually didn't paint until the next day but after 2 hours you should be ready to go. The best paint to use on clay is high gloss exterior latex paint. However, since my pot is staying indoors and I did NOT want to spend money on new paint, I used acrylic paint I already owned. I knew this could cause potential problems but again I was willing to try.

So as you can see, one coat did not work...
So I waited until it dried (30 minutes) and gave it another coat.

After another paint job and some soil, here is the new and improved pot and plant...
If you are lucky enough to have a front porch, back porch, or anywhere outside to display plants, I suggest you tackle this project. It is very fun and easy, plus bright colors can really spice up an outside area. Or if you are like me and live half underground (bottom level condo), with no outside area to claim as your own, go for a little window sill pot. Not liking the green and purple? Go for all yellow like in the post here or red, orange, or any color of the rainbow. The choices are endless.

Summer is coming...happy painting!

Tuesday, May 4, 2010

Sock Elephant

Well I am back to share my latest and greatest sock creation. My first transformation came in the form of a sock monkey (you can read all about that here).
When my brother and sister-in-law bought me this book for my birthday, I was very excited to bring another pair of socks to life.

After a few trips to various stores, I found the right pair of socks for my new project.

4 hours later, with a few breaks in between, I finished the elephant.

Quite the cutie isn't she?
Side view
I am quickly acquiring a small zoo of sock animals. As much as I enjoy making them, they are beginning to collect dust on my shelf. I love that "feeling of accomplishment" when I am done, but would love to pass their happiness along. In other words- they're are up for sale. I currently have a pink sock monkey and this elephant up for grabs. If you are interested post on this comment and I'll contact you privately.

Stayed tuned..I'll be back with yet another sock creation soon.